It’s been a long time since first part of this project was published… Sorry for that, but end of year, here, in France, is usually very busy, both from a professional and a personal point of view: projects to complete before holidays, kids demonstrations in their various activities, end of school year meetings,…
Anyway !
Now that the hardware is installed (see previous article), it’s time to have a quick view to the analogic to numeric converter part of the project.
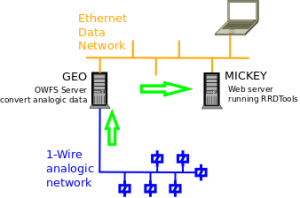
Just a reminder of the overall architecture:

Software install
I used the excellent OWFS 1-Wire File System. It creates a pseudo file system on your Linux box where you can get all informations you need from the connected 1-Wired devices.
Compile
Get the latest package version (owfs-2.8p7.tar.gz in my case) from the web site above, and “untar” it in your directory.
As I wanted a minimal config on this server (I installed much more dependencies on my laptop for testing, but here, this is the “production” server, so…), I just had to install the following components:
- libusb-dev: simply usual
sudo apt-get install libusb-dev - libfuse-dev: similar magic command
sudo apt-get install libfuse-dev - swig: same
sudo apt-get install swig
With this in place, a simple ./configure --enable-debian from the place where you have “untared” your package, returns, at the end:
Module configuration:
                    owlib is enabled
                  owshell is enabled
                     owfs is enabled
                  owhttpd is enabled
                   owftpd is enabled
                 owserver is enabled
                    ownet is enabled
                 ownetlib is enabled
                    owtap is enabled
                    owmon is enabled
                   owcapi is enabled
                     swig is enabled
                   owperl is enabled
                    owphp is DISABLED
                 owpython is DISABLED
                    owtcl is DISABLED
Then, you can go for the usual make and sudo make install and things are done (installed by default to /opt/owfs)…
Some fine installation tuning
PATH
Add owfs binary directory to your PATH (it does not hurt, and simplifies usage). For that I edit the file /etc/environment, to enter:
PATH="/bin:/sbin:/usr/bin:/usr/sbin:/usr/local/bin:/usr/local/sbin:/opt/owfs/bin"
MANPATH
Add owfs manpath as corresponding to the binary directory in file /etc/manpath.config. I just added the following line, at the bottom of the “MANPATH_MAP” section:
MANPATH_MAP /opt/owfs/bin /opt/owfs/share/man
START/STOP SCRIPT
I created a start/stop script, that I stored in /etc/init.d directory, and named owserver:
#!/bin/sh

### BEGIN INIT INFO
# Provides:		owserver
# Required-Start:	$local_fs
# Required-Stop:	$local_fs
# Should-Start:
# Should-Stop:
# Default-Start:	2 3 4 5
# Default-Stop:		0 1 6
# Short-Description:	OW file server
# Description:		Debian init script for owserver
### END INIT INFO

PATH="/bin:/sbin:/usr/bin:/usr/sbin:/usr/local/bin:/usr/local/sbin:/opt/owfs/bin"

DAEMON=/opt/owfs/bin/owserver
NAME=owserver
DESC="1wire file server"
DIR=/var/run/${NAME}
LOG=$DIR/${NAME}.log
PID_FILE=$DIR/${NAME}.pid

test -x "${DAEMON}" || exit 0

. /lib/lsb/init-functions

set -e

case "${1}" in
	restart|reload|force-reload)
		$0 stop
		$0 start
		;;

	start)
		log_action_begin_msg "Starting the ${DESC}"

		test -d ${DIR} || mkdir -p ${DIR}
		test -r ${PID_FILE} && rm ${PID_FILE}

		echo -n "Start ${NAME} " >> $LOG
		date >> $LOG

		"${DAEMON}" -p 4304 -u  >> $LOG

		PID=`ps -ef | grep "${DAEMON}" | grep -v grep | awk '{print $2}'`
		if [ "${PID}X" != "X" ]; then
			echo "... successful start, with PID = ${PID}" >> $LOG
			echo ${PID} > $PID_FILE
			log_action_end_msg 0
		else
			echo "... failed to start" >> $LOG
			test -r $PID_FILE && rm $PID_FILE
			log_action_end_msg 1
		fi

		;;

	stop)
		log_action_begin_msg "Stopping the ${DESC}"

		if [ -r ${PID_FILE} ]; then
			PID=`cat ${PID_FILE}`
			kill ${PID}
			rm ${PID_FILE}
		else
			killall ${NAME}
		fi

		echo -n "Stop ${NAME} " >> $LOG
		date >> $LOG
		echo " " >> $LOG

		log_action_end_msg 0
		;;

	force-stop)
		if [ -r ${PID_FILE} ]; then
			PID=`cat ${PID_FILE}`
			kill ${PID}
			rm ${PID_FILE}
		else
			killall -9 ${NAME}
		fi

		echo -n "Stop ${NAME} - force-stop " >> $LOG
		date >> $LOG
		echo " " >> $LOG

		log_action_end_msg 0
		;;

	display)
		if [ -r ${PID_FILE} ]; then
			PID=`cat ${PID_FILE}`
			echo "${NAME} is running under pid = ${PID}"
		else
			echo "Cannot find PID file for ${NAME}... not sure if running properly..."
		fi
		;;

	*)
		echo "Usage: ${NAME} {start|restart|reload|force-reload|stop|force-stop|display}"
		exit 1
		;;
esac

exit 0
And remember to update the various rc*.d links:
sudo update-rc.d owserver defaults
Run some tests
You can now start it (“out of the box”):
sudo /etc/init.d/owserver start
… and use it :
hugue@geo:~$ /opt/owfs/bin/owdir
/28.E4B5E0020000
/28.94B1E0020000
/28.34CEE0020000
/28.BCC4E0020000
/28.3ECFE0020000
/28.6DD3E0020000
/28.BFCAE0020000
/81.AA732F000000
/bus.0
/uncached
/settings
/system
/statistics
/structure
/simultaneous
/alarm
As you can see, my 7 probes are there, identified with “cryptic names”, but accessible…
Let’s look at the first one values:
hugue@geo:~$ /opt/owfs/bin/owdir /28.E4B5E0020000
/28.E4B5E0020000/address
/28.E4B5E0020000/alias
/28.E4B5E0020000/crc8
/28.E4B5E0020000/errata
/28.E4B5E0020000/family
/28.E4B5E0020000/fasttemp
/28.E4B5E0020000/id
/28.E4B5E0020000/locator
/28.E4B5E0020000/power
/28.E4B5E0020000/r_address
/28.E4B5E0020000/r_id
/28.E4B5E0020000/r_locator
/28.E4B5E0020000/temperature
/28.E4B5E0020000/temperature10
/28.E4B5E0020000/temperature11
/28.E4B5E0020000/temperature12
/28.E4B5E0020000/temperature9
/28.E4B5E0020000/temphigh
/28.E4B5E0020000/templow
/28.E4B5E0020000/type
This shows you all the attributes of this 1-wire device.
If you are looking for immediate temperature, just pick up the “temperature” attribute:
hugue@geo:~$ owread /28.E4B5E0020000/temperature
        24.3135
What is wonderful in this script, is that it is directly available on the web (using port you have defined when launching the daemon).
For example, I can run the same command from my laptop (my owfs server is named GEO):
hugue@Raistlin4:~$ owread -s geo:4304 /28.E4B5E0020000/temperature
     24.3125
Next step: graph rendering using RRD tools and a home made set of scripts….

Pingback: Temperature probes (part 3&4)